Most e-commerce tracking setups send revenue as the conversion value to Google Ads, GA4, and other platforms. That also means your bidding algorithms optimize for revenue — but revenue doesn’t tell you whether a sale was actually profitable.
A €200 order with a 5% margin is worth less to your business than a €50 order with a 60% margin.
Profit tracking replaces revenue with profit as the conversion value. Instead of optimizing for ROAS (Return on Ad Spend), your campaigns optimize for POAS (Profit on Ad Spend) — aligning ad spend with actual business outcomes.
Server-Side GTM makes this possible without touching your website’s code — and critically, without exposing sensitive margin data to the browser. Profit margins and cost prices are confidential business data that should never be visible to end users.
With a server-side approach, the lookup happens entirely on your SGTM server: your profit data never appears in the dataLayer, network requests, or anywhere else a user could inspect.
The idea: maintain a simple Google Sheet with your product profit data, and let your SGTM container look up the profit for each product in real time. The conversion tags then send profit instead of revenue.
This guide walks you through the full setup using owntag and the Google Sheets Lookup variable template.
How It Works
The setup has three parts:
- A Google Sheet with your product data — at minimum a product identifier (like a SKU) and the corresponding profit per unit.
- A lookup variable in your Server-Side GTM container that queries the sheet whenever a conversion event comes in.
- Your conversion tags (GA4, Google Ads, Meta CAPI, etc.) configured to use the looked-up profit value instead of the original revenue.
When a purchase event arrives at your server container, the lookup variable takes the product SKU from the event, finds the matching row in your Google Sheet, and returns the profit value. Your tags then send that profit as the conversion value.
Prerequisites
Before you start, make sure you have:
- A running Server-Side GTM container on owntag (see Getting Started if you haven’t set one up yet)
- A Google Service Account connected to your owntag container
- The Google Sheets API enabled in your Google Cloud project (under APIs & Services → Library in the Google Cloud Console)
- A Google Sheet with your product profit data (we’ll set this up in the next step)
The Google Service Account is needed so your SGTM container can authenticate with the Google Sheets API. You don’t need any special IAM roles for Sheets access — instead, you share the spreadsheet directly with the service account’s email address. For the full setup guide, see our Google Service Account documentation.
Step 1: Create Your Profit Spreadsheet
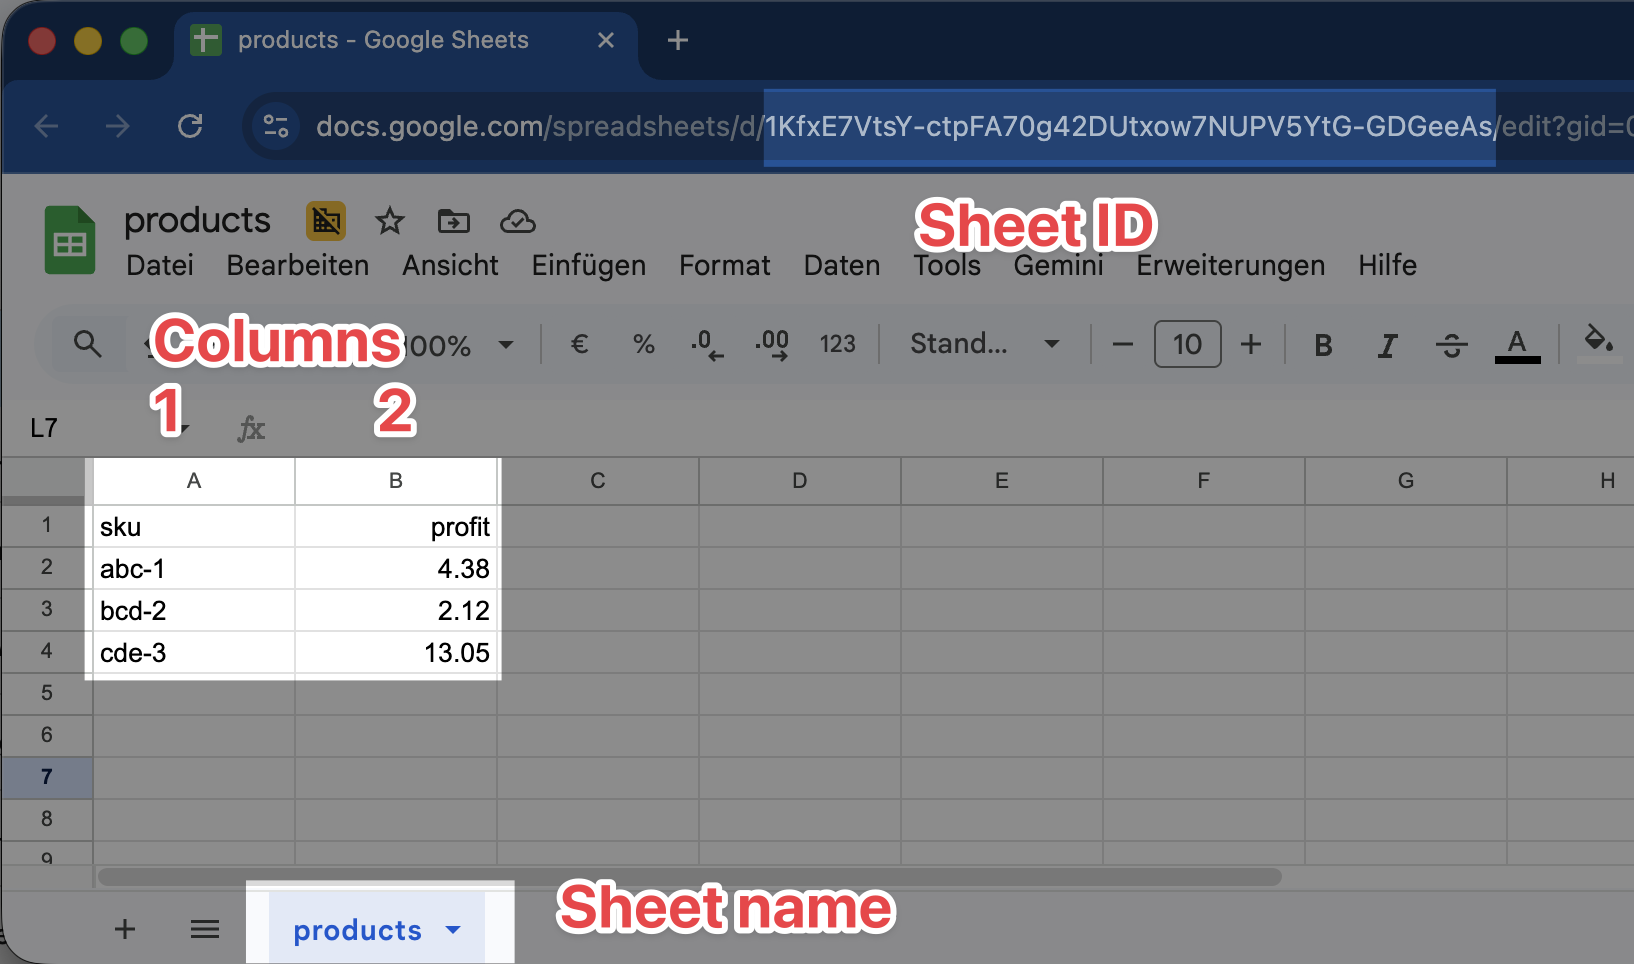
Create a new Google Sheet (or use an existing one) with at least two columns:
- Column A — the product identifier (SKU, item ID, or whatever your tracking uses)
- Column B — the profit per unit for that product
The first row should contain headers. Here’s an example:
The profit value should be the net profit per unit sold — after subtracting cost of goods, shipping costs, payment processing fees, or whatever costs you want to account for. How granular you make this is up to you and your finance team.
Take note of these values from your spreadsheet — you’ll need them later:
- Spreadsheet ID: The long string in the URL between
/d/and/edit(e.g.1KfxE7VtsY-ctpFA70g42DUtxow7NUPV5YtG-GDGeeAs) - Sheet name: The tab name at the bottom of the spreadsheet (e.g.
products)
Share the Sheet with Your Service Account
Open the sharing settings of your spreadsheet and add the service account’s Client Email address as a viewer. You can find this email address in the owntag console under your container’s Google Service Account section:
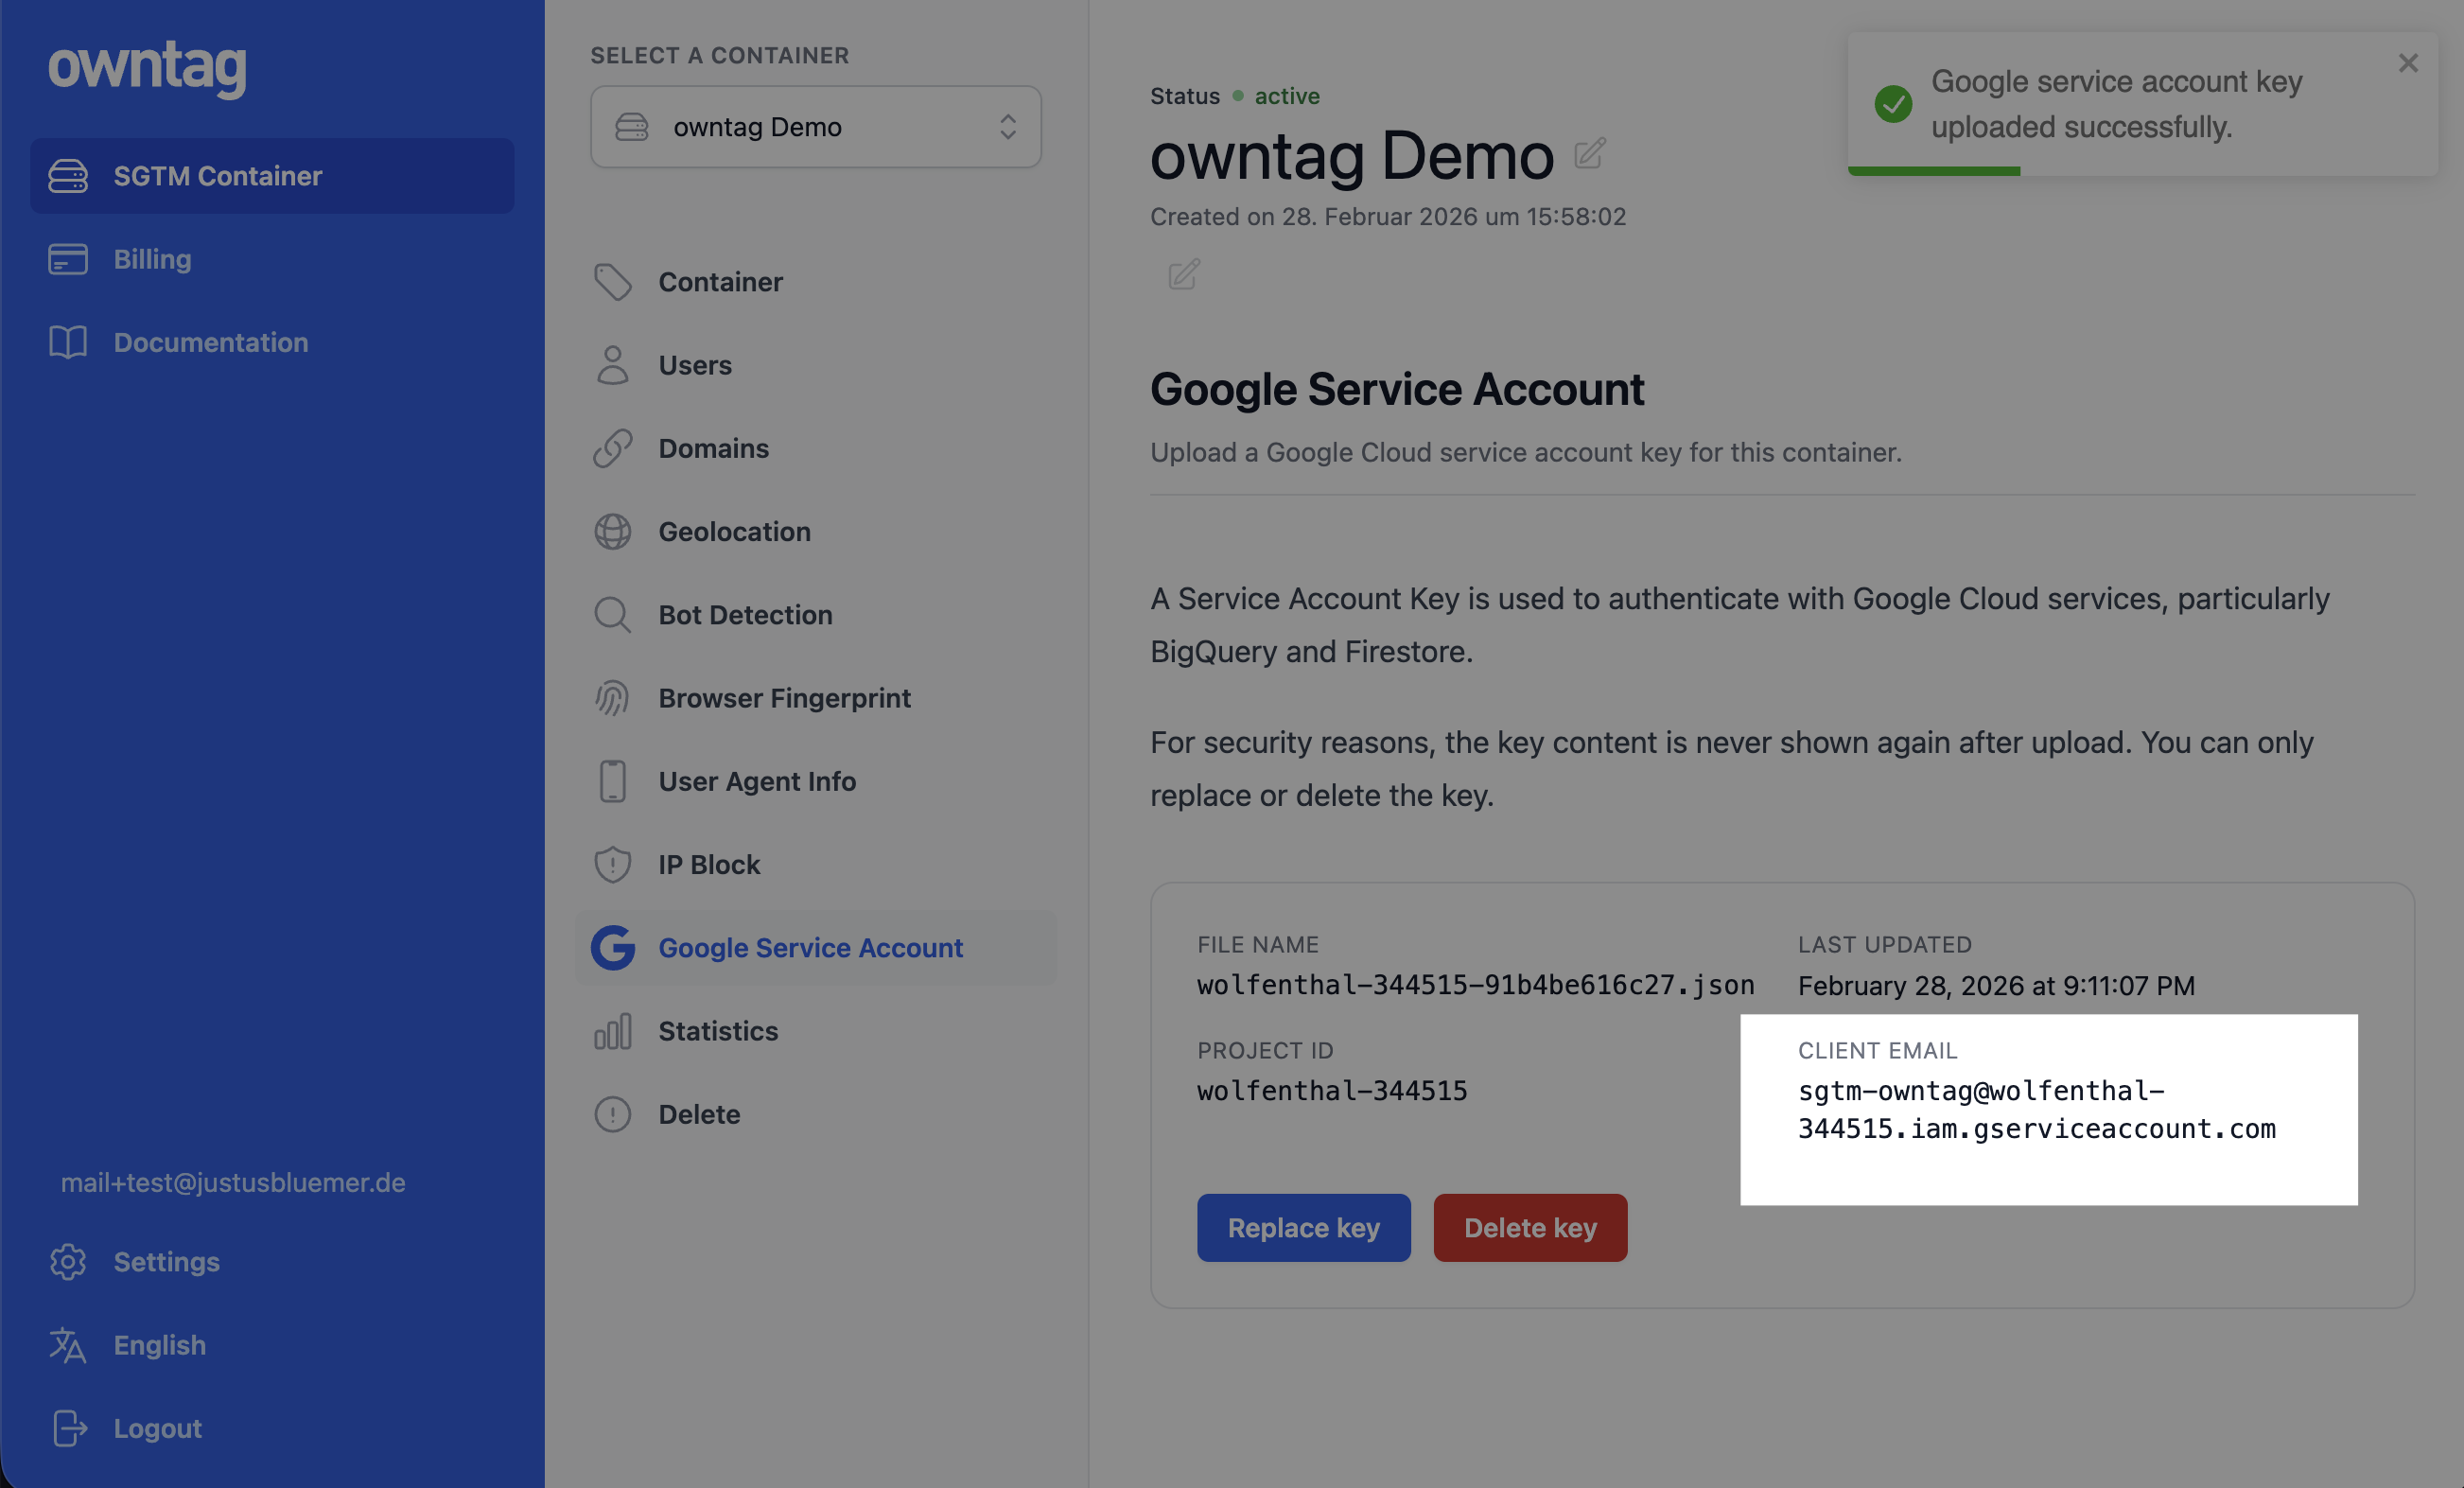
This works the same as sharing a spreadsheet with a colleague — the service account email looks like a regular Google account to Google Sheets.
Step 2: Import the Lookup Template
Download the template.tpl file from the owntag Google Sheets Lookup repository on GitHub.
In your Server-Side GTM container at tagmanager.google.com:
- Go to Templates in the left sidebar.
- Under Variable Templates, click New.
- Click the three dots menu (top right) and select Import.
- Upload the downloaded
template.tplfile. - Click Save.
Step 3: Create the Lookup Variable
Now create a variable that uses the imported template to look up profit values.
- Go to Variables in your server container.
- Under User-Defined Variables, click New.
- Choose the owntag Google Sheets Lookup template as the variable type.
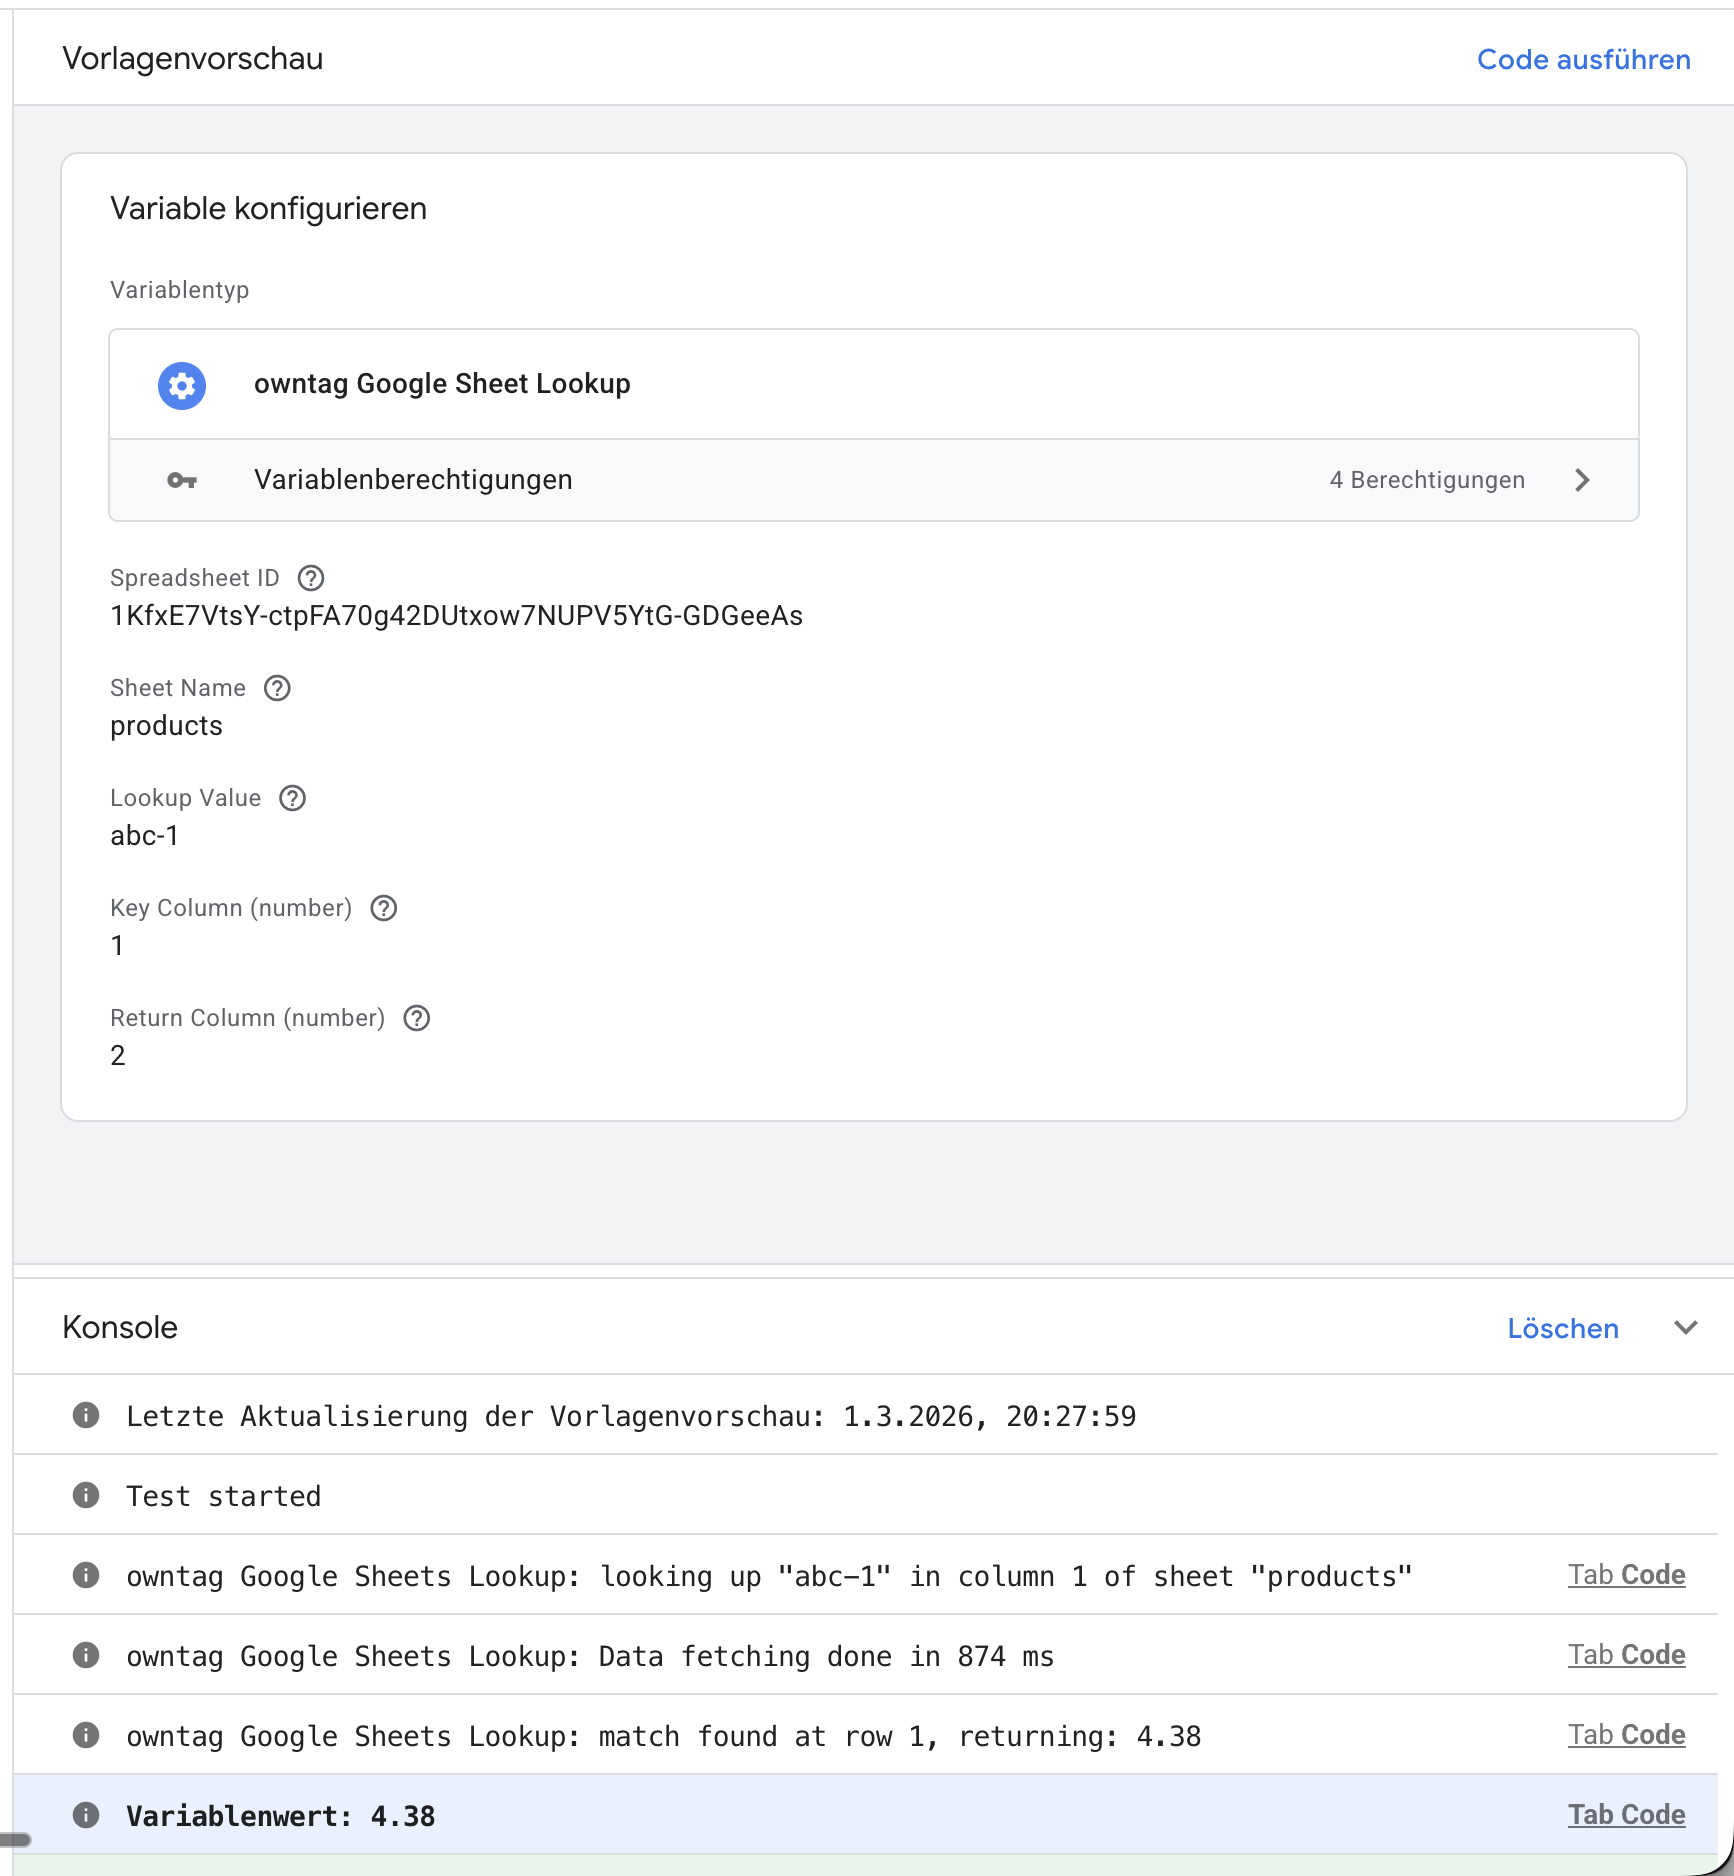
- Configure the fields:
| Field | Value | Example |
|---|---|---|
| Spreadsheet ID | The ID from your sheet URL | 1KfxE7VtsY-ctpFA70g42DUtxow7NUPV5YtG-GDGeeAs |
| Sheet Name | The tab name in your spreadsheet | products |
| Lookup Value | A GTM variable resolving to the product SKU | {{ecommerce.0.item_id}} |
| Key Column (number) | Column number to search in (A = 1, B = 2, …) | 1 |
| Return Column (number) | Column number with the profit value | 2 |
| Return type | Number | — |
Set the Return type to Number. This ensures the returned profit value is treated as a number, not a string — which is required when using it in conversion value fields or calculations.
The Lookup Value is the key piece. {{ecommerce.0.item_id}} resolves to the item_id of the first item in the event’s e-commerce data. Make sure this matches what your tracking sends as the product identifier and what you’ve put in column A of your sheet.
Enable Caching
In the variable configuration, enable caching and set an appropriate duration (the default is 5 minutes). With caching on, the sheet data is fetched once and reused for subsequent lookups within the cache window. This significantly reduces API calls and speeds up your container.
Adjust the cache duration based on how often your profit data changes. If you update margins weekly, a 60-minute cache is fine. If they change multiple times a day, keep it shorter.
Name the variable something descriptive like sheets.product_profit and save it.
Step 4: Use Profit in Your Conversion Tags
With the lookup variable in place, you can now reference it in your tags to send profit instead of revenue.
Google Analytics 4
In your GA4 tag that tracks the purchase event, use the Parameters to Add / Edit section under Event Parameters to override the value field:
| Parameter Name | Value |
|---|---|
value | {{sheets.product_profit}} |
This replaces the original revenue value with the profit from your Google Sheet. GA4 will then report this as the event’s value, and any revenue metrics in your GA4 reports will reflect profit instead.
If you want to keep the original revenue in GA4 and track profit separately, use a custom parameter name like profit instead of overriding value. You can then create a custom metric in GA4 to report on it. However, for Google Ads value-based bidding, the value parameter is what gets used — so if POAS bidding is your goal, override value.
Google Ads
In your Google Ads Conversion Tracking tag, set the Conversion Value field to your lookup variable:
| Field | Value |
|---|---|
| Conversion Value | {{sheets.product_profit}} |
Google Ads will use this profit value for its bidding algorithms. When you switch to a Maximize Conversion Value or Target ROAS bidding strategy, Google will effectively optimize for POAS — since the “value” it sees is your profit.
Meta Conversion API
If you’re using the Meta Conversion API (CAPI), you can similarly set the conversion value in your CAPI tag to the profit variable. The exact field name depends on the tag template you’re using, but it’s typically labeled Event Value or Value.
Handling Multi-Item Orders
The setup above works well for events that involve a single product — like add_to_cart, view_item, or single-item purchases. For purchase events with multiple items, the profit calculation is more involved: you need to look up the profit for each item, multiply by its quantity, and sum the results.
The Google Sheets Lookup variable returns a single value per lookup. To calculate the total order profit across all items, you’ll need a custom variable template in SGTM that:
- Reads the items array from the event data.
- For each item, calls the Google Sheets Lookup to get the profit per unit.
- Multiplies each profit by the item’s quantity.
- Returns the total.
Building a custom variable template is beyond the scope of this guide, but it’s a well-documented pattern in the GTM community.
Best Practices
Keep Your Spreadsheet Up to Date
Your profit data is only as good as the data in your Google Sheet. Establish a regular update process — whether that’s a manual weekly export from your ERP system, an automated sync via Google Apps Script, or a direct integration with your product database.
Use Meaningful Product Identifiers
Make sure the product identifier in your Google Sheet matches exactly what your tracking sends. If your dataLayer uses item_id with values like SKU-1234, your sheet must use the same format — not sku-1234 or 1234. The lookup is case-sensitive and expects an exact match.
Set a Fallback Value
Consider what should happen when a product isn’t found in the sheet — for example, a newly added product that hasn’t been added to the spreadsheet yet. The variable will return undefined if no match is found. Depending on your tag configuration, this could result in the conversion being sent with no value at all.
You can handle this with a Lookup Table or RegEx Table variable in GTM that checks the output: if the profit variable returns a value, use it; otherwise, fall back to the original value from the event (so you at least track revenue rather than nothing).
Monitor in Preview Mode
After setting everything up, always verify in Server-Side GTM’s Preview Mode before publishing. Trigger a test event and check:
- The lookup variable resolves to the expected profit value (visible in the Variables tab).
- Your conversion tags send the correct value (visible in the outgoing requests).
- The console logs show successful Google Sheets lookups without errors.
Troubleshooting
If the lookup variable doesn’t return a value, check:
- Google Service Account: A valid key must be uploaded in the owntag console. See our Google Service Account guide.
- Google Sheets API: Must be enabled in your Google Cloud project under APIs & Services → Library.
- Sheet sharing: The spreadsheet must be shared with the service account’s email address.
- Spreadsheet ID: Must match exactly — copy it from the URL between
/d/and/edit. - Sheet name: Case-sensitive. Must match the tab name at the bottom of the sheet exactly.
- Column numbers: Start at 1 (column A = 1, column B = 2).
- Lookup value: Verify the GTM variable you’re using (e.g.
{{ecommerce.0.item_id}}) actually resolves to a value that exists in your sheet.
For detailed template documentation and additional troubleshooting, see the Google Sheets Lookup template page.