Guide: Set up Meta Conversion API (CAPI) with Server Side GTM
Learn how to set up Meta Conversion API (CAPI) with Server Side Google Tag Manager (SGTM) for better data quality.

Justus Blümer
owntag Founder
published April 7, 2025
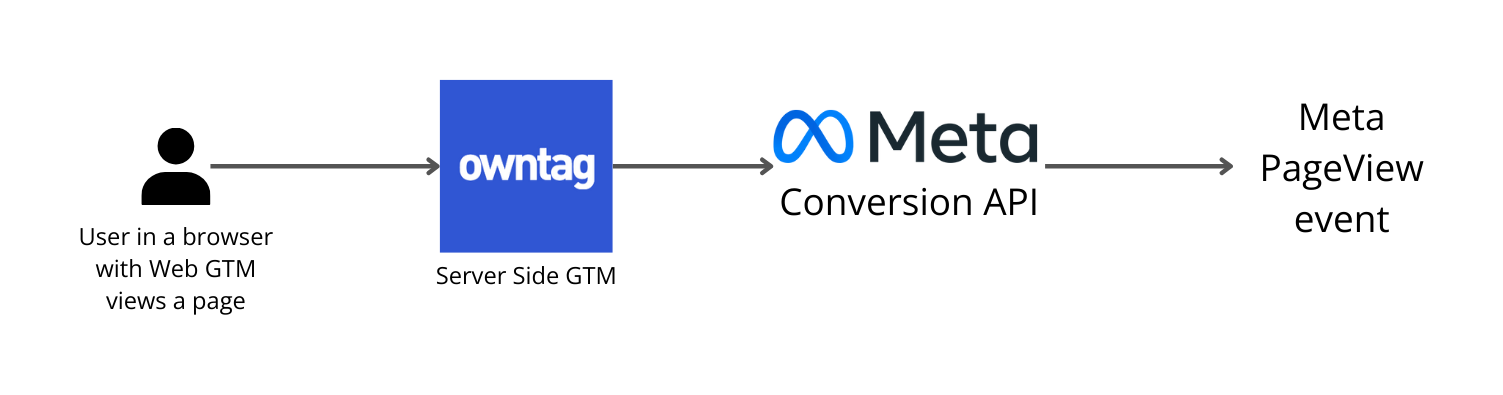
The Meta (formerly Facebook) Conversion API (CAPI) is an interface that allows you to send data from a server to Meta.
In this case, the server is your Server Side Google Tag Manager.
The client- or browser-side counterpart, which sends data directly from the user’s browser to Meta, is the Meta Pixel.
If you haven’t set up a Server Side GTM yet, you’re in the right place! That’s actually owntag’s specialty — we’re a server-side GTM hosting provider from Germany.
If you want to know how to easily set up your own Server Side GTM with owntag, check out our SGTM setup guide.
This guide here assumes that your SGTM is already up and running. The steps are the same even if you’re not hosting with owntag, but for example with Google Cloud Platform.
We also assume you already have a Meta Business Account and a Meta Pixel set up. If not, you can follow Meta’s setup instructions here.
CAPI-only vs. dual setup with client and server-side tracking
You have two options for implementing Meta CAPI tracking:
a) Conversion-API-only
You send data exclusively via the Conversion API. This gives you full technical control over what data is collected and what is sent to Meta — like the user’s IP address or the URL being transmitted.
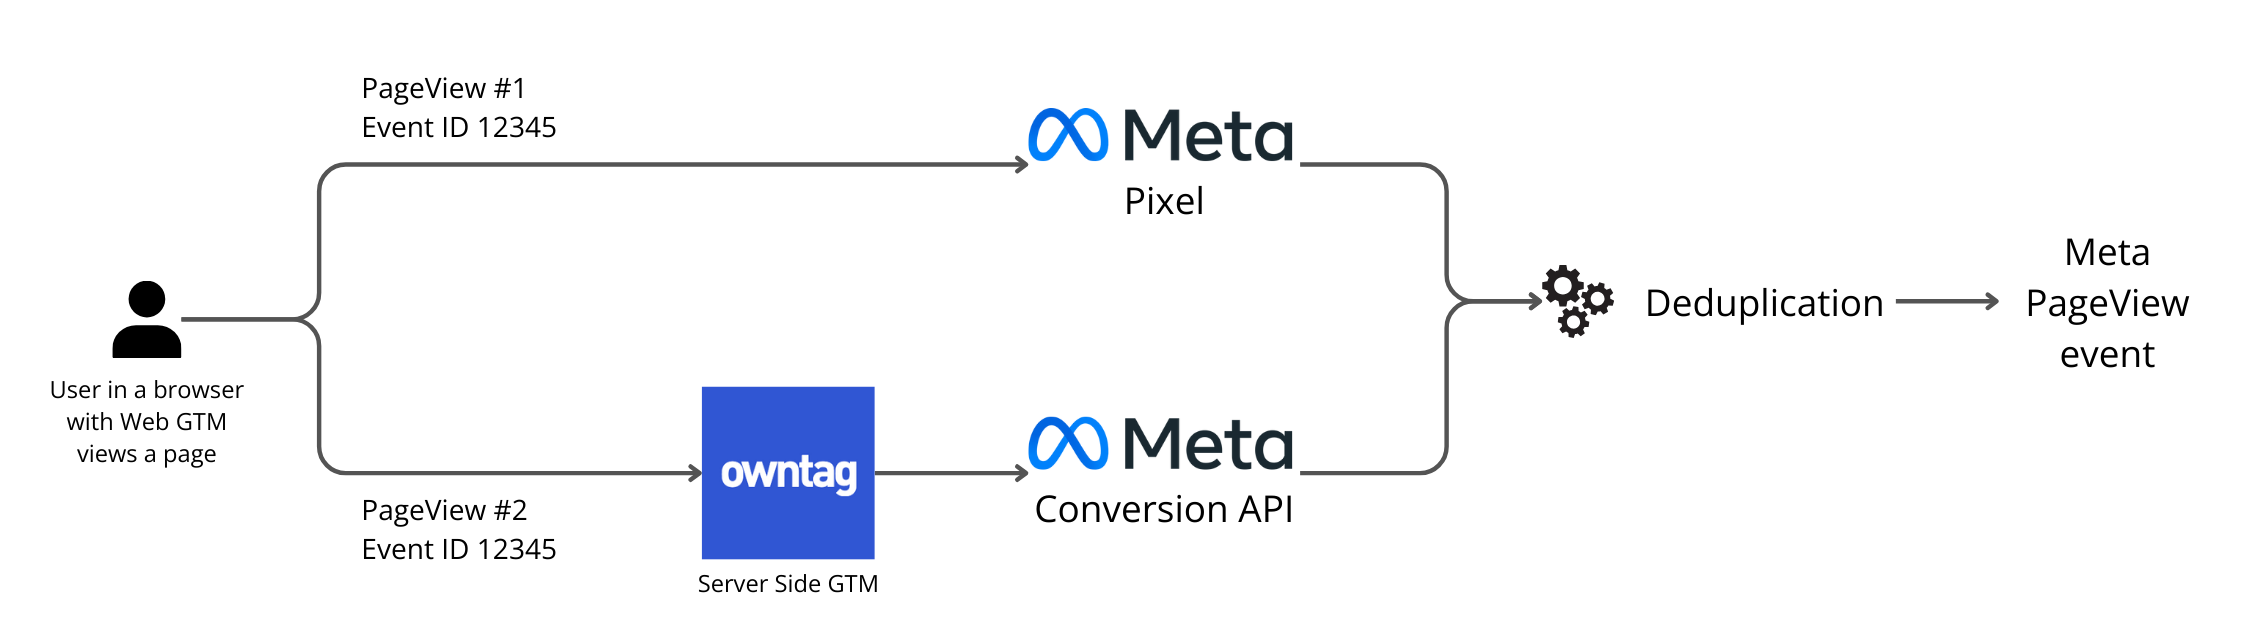
b) Conversion API + Pixel with deduplication
You send data both through the Conversion API and via the Meta Pixel in the browser. This way, you benefit from server-side tagging (like better technical control and fewer issues with ad blockers), while still allowing Meta to collect browser data and use 3rd-party cookies — which are still relevant in 2025, especially for remarketing.
To prevent duplicate counting, events sent both via Pixel and CAPI must share a unique event ID. Meta uses this ID to deduplicate — meaning it keeps only one event for analysis.
→ Meta recommends Option B as it provides more data.
But don’t let that overly influence your decision — if basic conversion tracking for your Meta Ads is enough for your use case, Option A (Conversion-APi-only) is totally fine.
1. Generate Meta Conversion API acess token
To send data from SGTM to Meta, you’ll need an access token. Meta will only accept data if this token is sent along with it.
You can generate it in the Meta Events Manager settings:
Scroll to the “Conversions API” section and click “Generate access token”:

Once clicked, your token will be shown only once — you can regenerate it at any time, and older tokens remain valid.
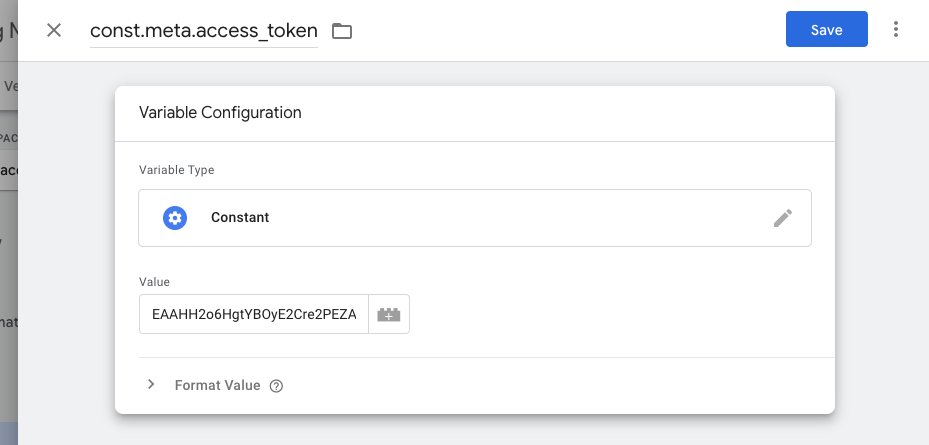
The most practical approach is to store this access token in a constant variable in your SGTM container.
That way, you can reuse it in multiple tags.
Also, create a “Constant” GTM variable for your Facebook Pixel ID while you’re at it.
2. Import the CAPI tag template
To send data to Meta when a tag fires, you need to import a Conversion API tag template first.
In SGTM, go to “Templates” and under the “Tag Templates” section click on “Search Gallery”.
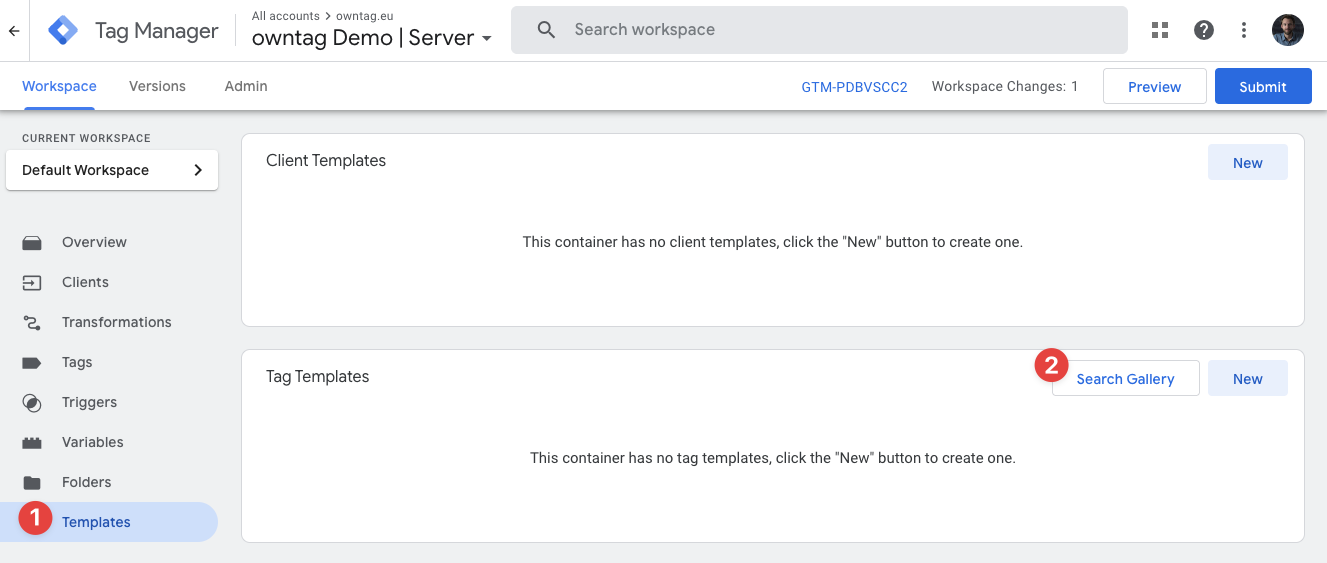
Search for “Facebook Conversion API”, click on it, and then click “Add to workspace”.
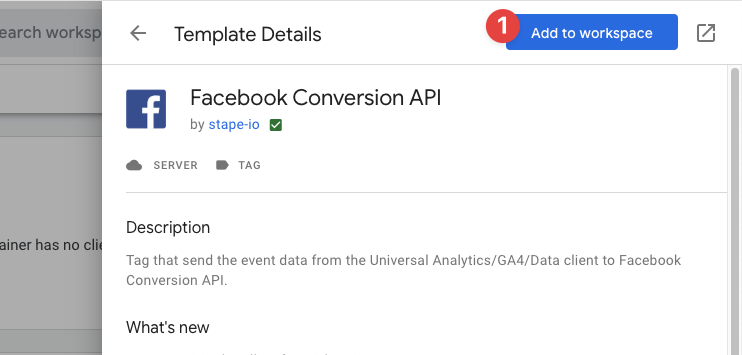
The tag template is now available in your container and you can use it to create tags.
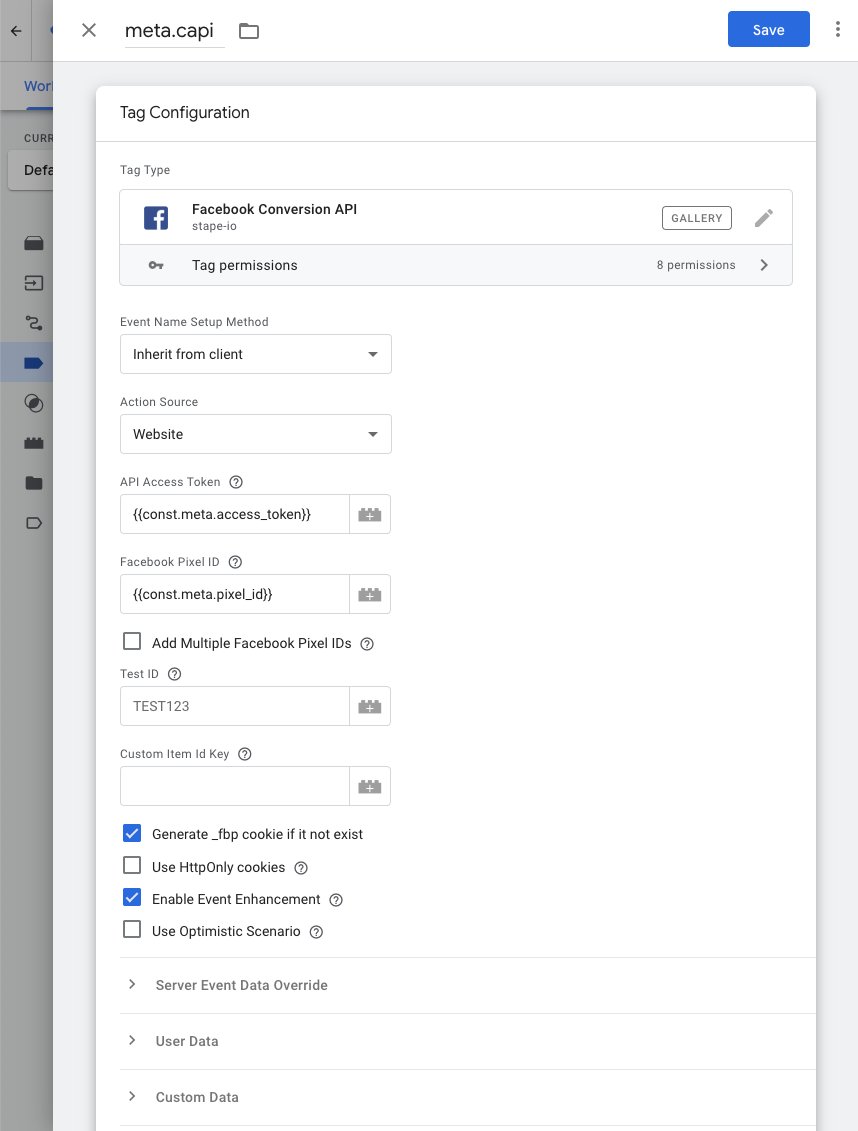
3. Create a Conversion API tag
Create a new tag and choose “Facebook Conversion API” (the template you just imported) as its tag type.
Configure the fields as follows:
- Event Name Setup Method → “Inherit from client”
- Action Source → “Website”
- API Access Token →
{{const.meta.access_token}}(Replace with your actual variable name.) - Facebook Pixel ID →
{{const.meta.pixel_id}}(Again, use your own variable name.)
Also check the box “Generate _fbp cookie if it not exist”.
4. Add a trigger to fire the tag
Add at least one trigger to fire the CAPI tag.
If you follow the recommended GA4 event names, this step becomes easier as one tag can process multiple events.
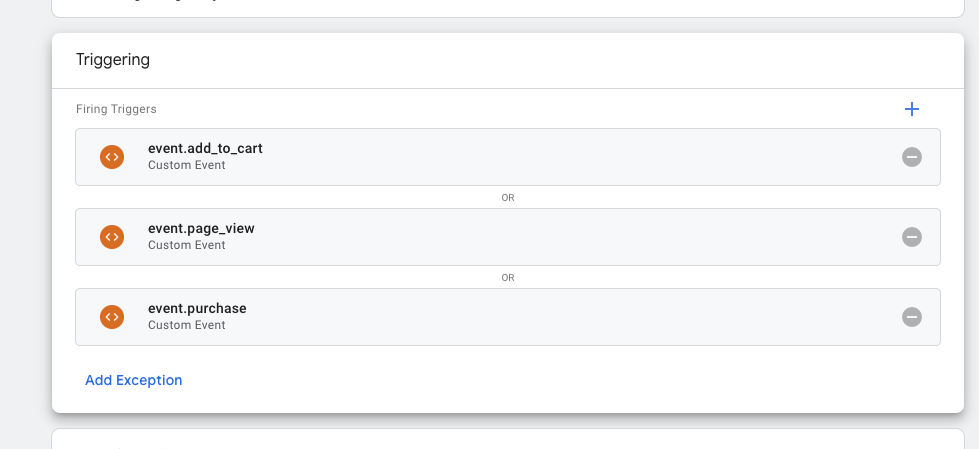
With “Event Name Setup Method” set to “Inherit from client”, the template auto-maps GA4 event names to Meta’s standard ones. Example:
| GA4 recommended event name | Meta standard event name |
|---|---|
| page_view | PageView |
| gtm.dom | PageView |
| add_payment_info | AddPaymentInfo |
| add_to_cart | AddToCart |
| add_to_wishlist | AddToWishlist |
| sign_up | CompleteRegistration |
| begin_checkout | InitiateCheckout |
| generate_lead | Lead |
| purchase | Purchase |
| search | Search |
| view_item | ViewContent |
| contact | Contact |
| customize_product | CustomizeProduct |
| donate | Donate |
| find_location | FindLocation |
| schedule | Schedule |
| start_trial | StartTrial |
| submit_application | SubmitApplication |
| subscribe | Subscribe |
| gtm4wp.addProductToCartEEC | AddToCart |
| gtm4wp.productClickEEC | ViewContent |
| gtm4wp.checkoutOptionEEC | InitiateCheckout |
| gtm4wp.checkoutStepEEC | AddPaymentInfo |
| gtm4wp.orderCompletedEEC | Purchase |
If you’re using custom event names not covered here, create separate Meta CAPI tags with dedicated triggers.
In that case, set “Event Name Setup Method” to “Override” and choose “Custom” for “Event Type”.
5. Event ID (for dual setup)
Set up Event ID only if you are also tracking via the Meta Pixel in the GTM Web Container.
When sending events via both server and browser, they must share the same Event ID.
This ensures Meta can recognize and deduplicate events that represent the same user action, e. g. 2 Purchase events (1 browser-sent, 1 server-sent) that relate to the same single purchase of the customer.
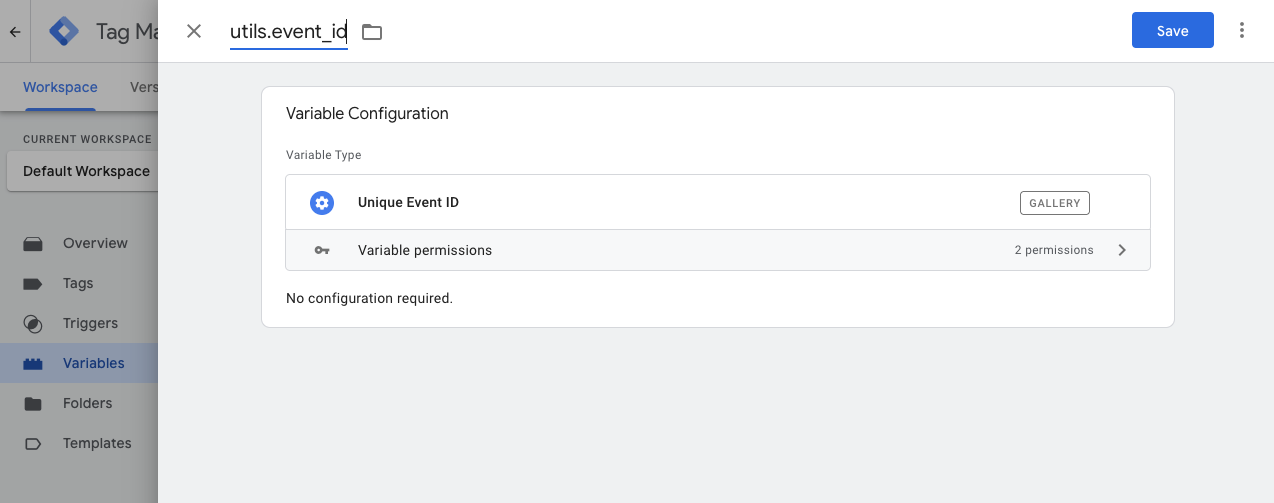
To generate the Event ID, go to your Web GTM container and import the Unique Event ID template from the Variable Template Gallery. Then create a variable based on it.
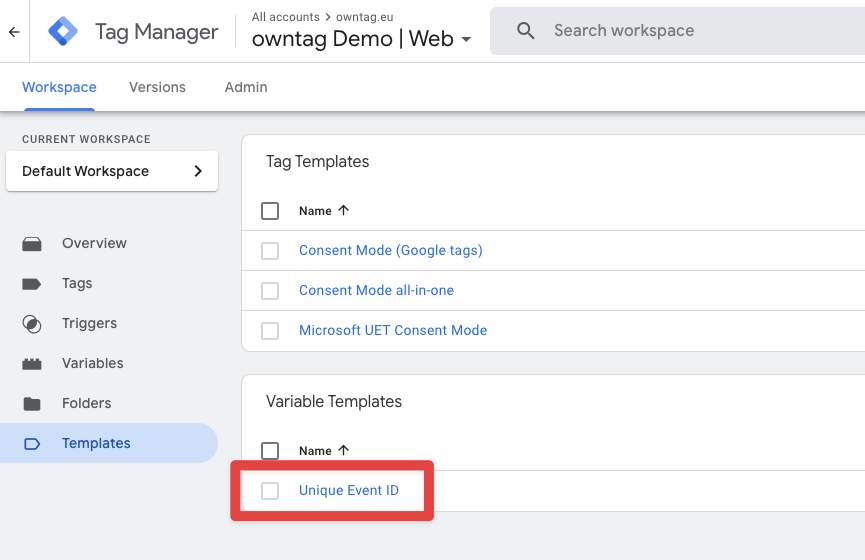
Then edit your Meta Pixel tag in the Web Container and reference the new variable in the “Event ID” field:
Apply this to all Pixel tags that correspond to server-side tracked events.
To forward the Event ID to the Server Side GTM, it depends on how you’re sending data.
If you’re using GA4 tags and the server_container_url parameter (as most owntag customers do), it’s best to use a GA4 Settings variable.
That GA4 Settings variable might already be used across your Google Tag and GA4 Event tags:
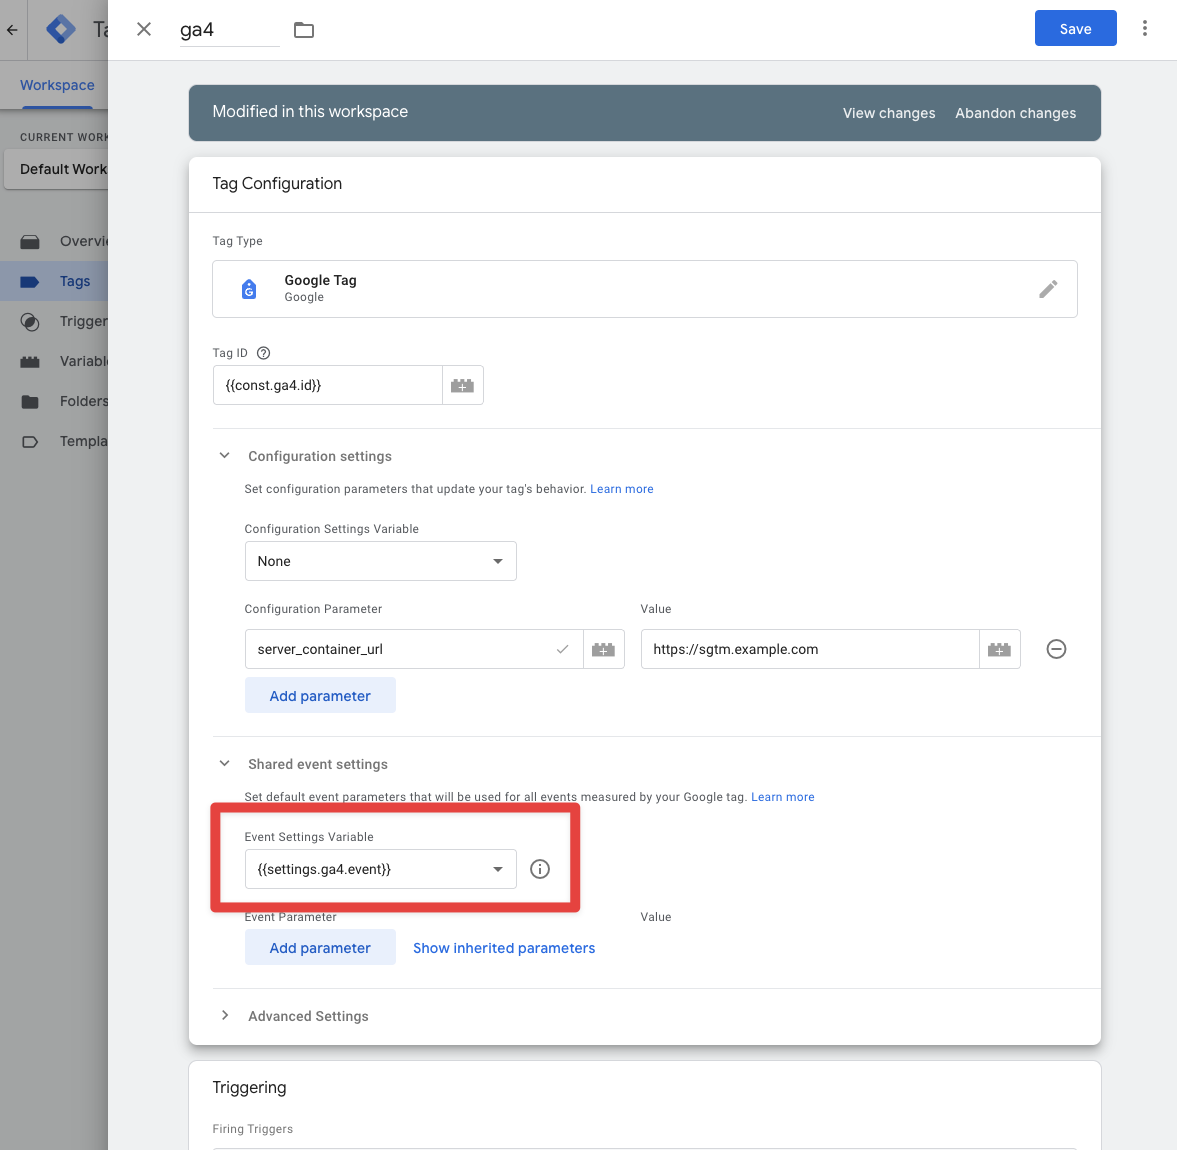
You can now include the Event ID variable there, so all GA4 events sent to SGTM will contain it:

6. Debug and verify success
To verify everything is working as expected, open your browser dev tools and go to the Network tab.
Also open the Server Side GTM Preview Mode in a separate tab.
Reload your website and trigger the event you want to test if it’s not the pageview itself.
Look for the GA4 request going to your server — I usually look for "collect?v=2…".
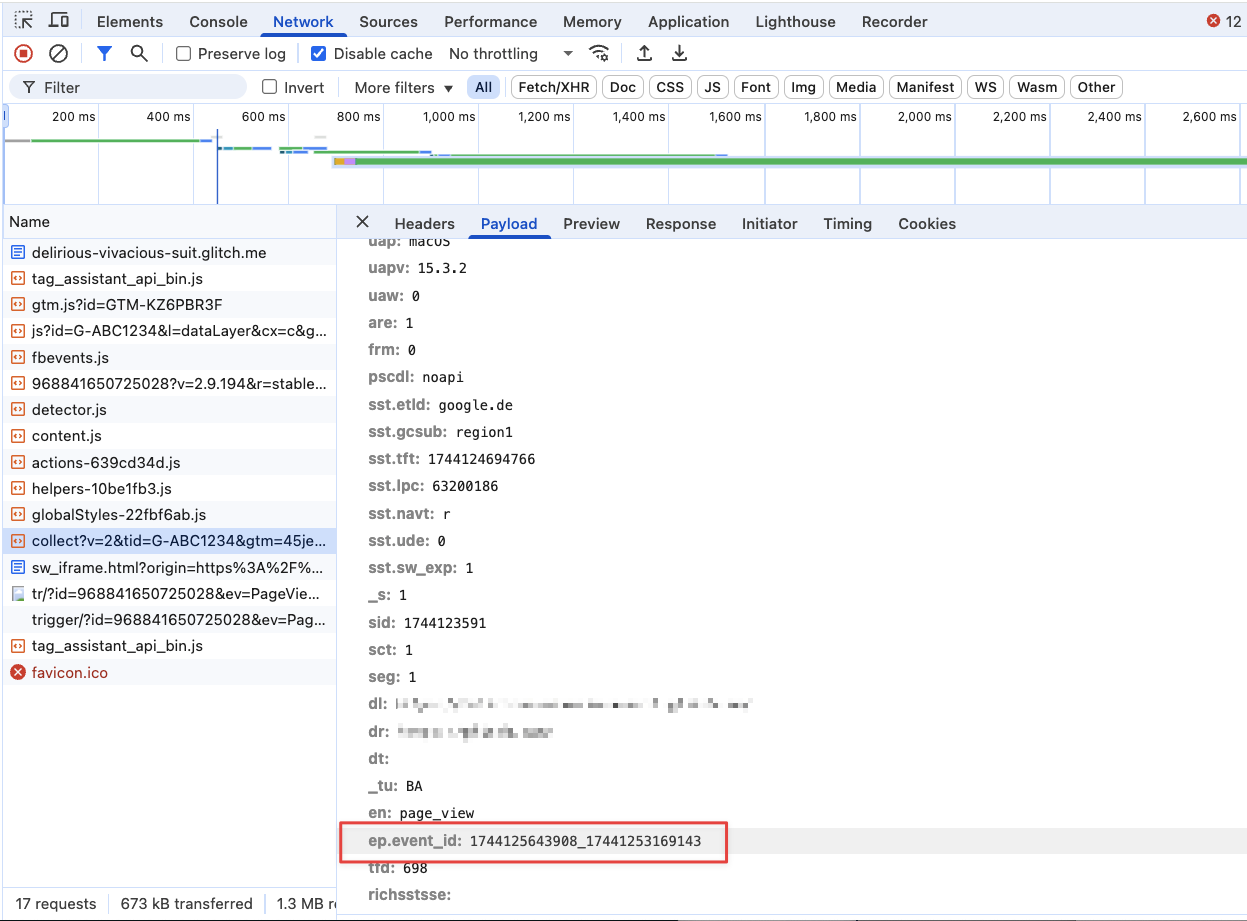
Note the “event_id” parameter from this request.
Then look at the outgoing request to facebook.com and find the eid parameter — that’s the Event ID Meta receives from the browser:
In the SGTM Preview tab, find the corresponding event and inspect the outgoing request to https://graph.facebook.com/…
Check that it includes the same event_id and that the HTTP status code is 200 — which means Meta accepted the event.
If not, scroll to the response body — it usually includes a helpful error message.
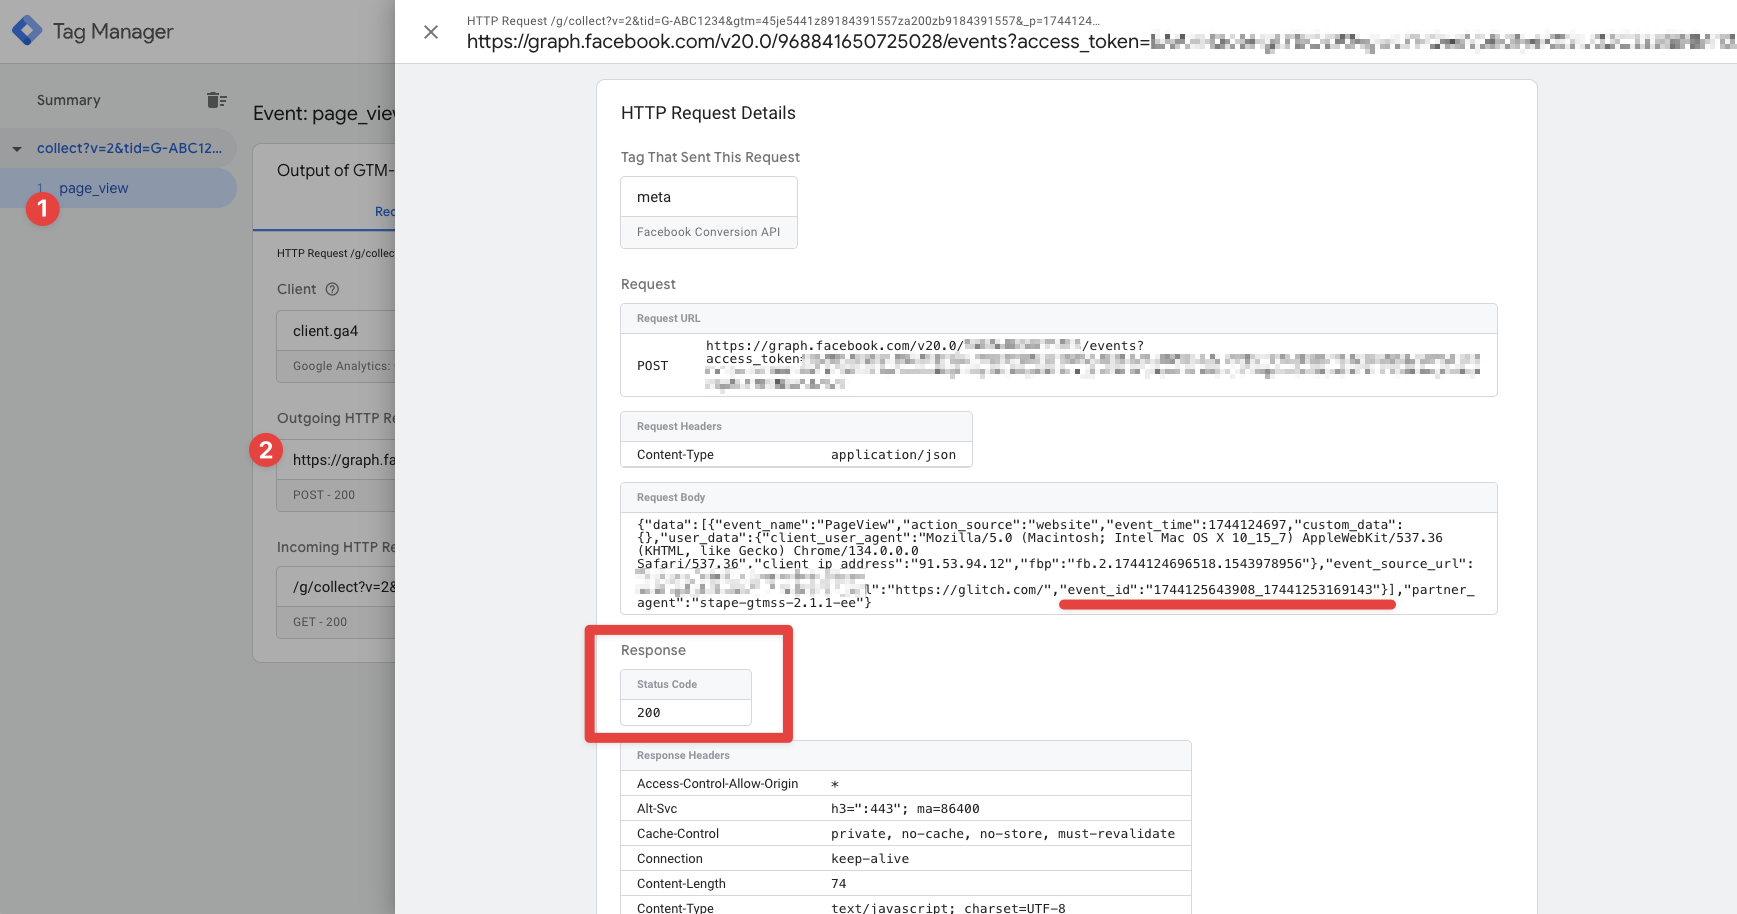
If the status code is 200 and event IDs match, you’ve successfully set up Meta Conversion API with deduplication.
Let data collect for a while and then check Meta Events Manager.
You’ll see which events were received:
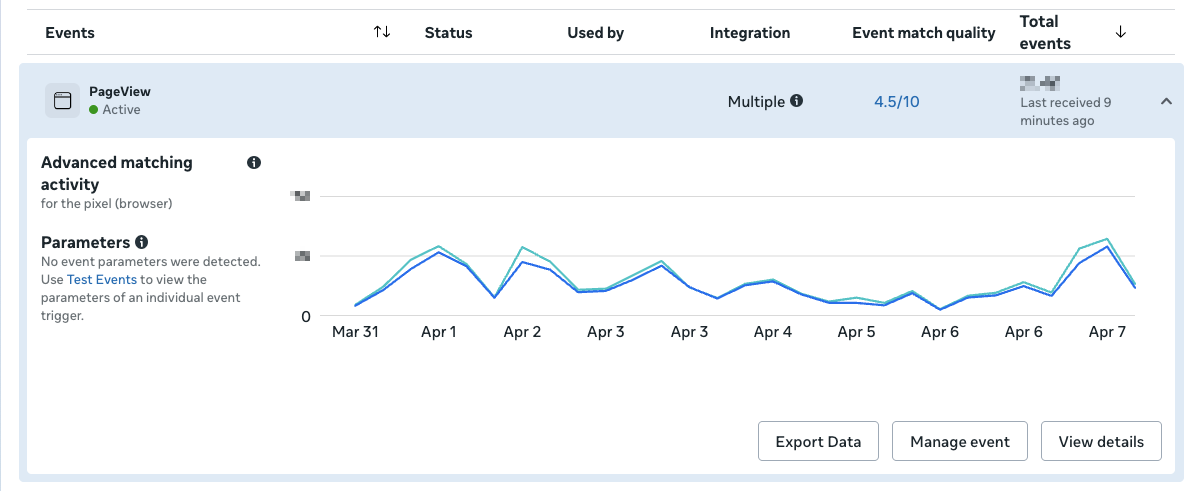
In general, the graphs for browser and server-side events should look similar.
We typically see 10–15% more server-side events.
(7. Consent Management)
Even in Server Side GTM, user consent must be respected depending on your jurisdiction.
We won’t cover this here, as implementation depends heavily on your individual consent management setup.
If your current setup ensures only consented data reaches SGTM, you likely don’t need additional checks within SGTM itself.
Special Case: Shopify
If you’re using Shopify, you might already know that it restricts tracking in the checkout and thank-you pages using Custom Web Pixels, a sandboxed environment.
Check our dedicated guide on setting up the GTM Web Container in Shopify.
When using Meta CAPI on Shopify through Web GTm, it’s important to manually send _fbp and _fbc cookie values to Meta — the browser won’t do it automatically in the sandbox.
Simo Ahava has a guide on how to extract these cookies and pass them to your SGTM.
Ready to go server-side?
Take control of your digital data collection with Server Side Tagging – easily and conveniently hosted with owntag.